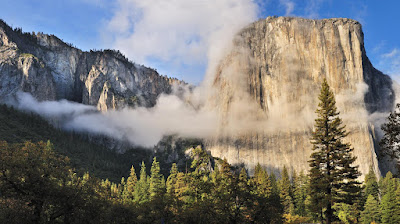
 This is the giant boulder, El Capitan at Yosemite. The day started with a very misty morning followed by a downpour in the early afternoon. The sky finally started to clear up in the late afternoon, on the way back from Tunnel View, we were presented with this amazing sun light shined on El Capitan. Grace snapped three shots that she mean for me to make a panoramic image. The proper way of shooting images for photomerge into panoramic image requires that all images be shot at exactly the same condition and preferably on a tripod with special panoramic platform. This was not the case for these images. The pictures were shot at WB set at A (automatic) and Aperture Priority. Thus both the With Balance and Exposure were different for the three images. Fortunately, the pictures were shot in RAW.
I first opened the three images in Nikon Capture NX2 and set the WB into Direct Sunlight. I then adjusted the "Picture Control" to "Landscape" to give them added contrast and sharpness. I adjusted the exposure compensation to decrease the middle image by 0.87 stop and the left image by 1.67 stop. The three images are now all in exactly the same condition. I then saved them as non-compressed TIFE files. Because I knew that I would do several further modifications of the images in Photoshop and Capture NX2, repeated compression in JEPG format would certainly degrade the quality of the images.
I opened the three images in Photoshop and photomerged them into a panoramic image. The merged picture showed clearly a prospective distortion, since she shot the image from an upward position. The distortion was corrected using Filter>Distort>Lens Correction of Photoshop. I re-cropped the image, the center upper part of the sky had a gap, I refilled it with the Stamp tool. I now saved the panoramic image in TIFE and reopened it in Capture NX2.
I used Shadow Protection to give the forest at the lower left side of the image more light and played around the Curve to further improve the overall contrast and saturation of the image. Now it is almost done, I saved the image, reopened it in Photoshop and applied the final Smart Sharpen (141%, 0.2 pixel, lens blur, more accurate) step as recommended by Ken Rockwell. When looking at 100%, there is some noise in the shadow area, since we did not use any noise reduction either in camera or during the post-processing. It is typical for the the Nikon D90/D300. The full-frame D700 would be better. But I doubt that I will see this noise in the final print.
The final image in non-compressed TIFE is 176.3 MB or just over 30 MP. I can make a non-interpolated print of 300 dpi at 24.7 x 13.9 inches. If not using the Photomerge and the computer softwares, we would need a medium format digital camera with a PC lens to get an image with such detail.
3 comments:
Wow! Is this really a photo...Have you ever thought of submitting your masterpiece to National Geographic?
Lots of work going to this - really enjoy seeing it.
Beautiful!:-)
Love your pictures!
Post a Comment